General Project Options
In this dialog you make the most important settings for the current project. This includes global specification of beat and tempo in BPM, recording and editing options, and snap and grid settings.
You open the general project options via menu File > Project properties > Project options… (keyboard shortcut: I).
Save as default: If you activate this option before closing the dialog with OK, the settings in the dialog will be the default values used in all newly created projects. This also happens if you open this dialog from the dialog New project.
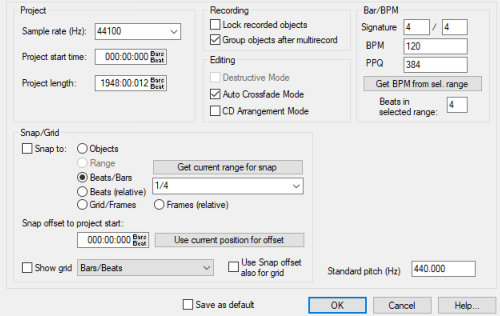
Project
-
Sample rate (Hz): This displays the sample rate used in the project.
If you change this value and the project already contains audio
-
Project start time: Here you can determine the project start time. This is useful when loading audio files that should be placed at the original time positions (timestamps) of the recording. If a recorder with free running timecode (clock) was used, this would create a gap of many hours in front of the audio, making zooming and navigation difficult. You can compensate for this gap by specifying a project start time. If you change the start time, you will be asked whether you want to leave the objects in the project at the current time positions or whether the time positions should be adjusted. With an adjustment, the objects remain visually at the same time position; without an adjustment, all objects are moved together with the timeline.
-
Project length: The project length is displayed here in bars and beats.
If the general program preference No change of project size when zooming is active, you can extend your project here. If this option is not active, the project will automatically extend when you zoom out further. In this case you can use the Project Length setting here to shorten it again.
Recording/Editing
Here you can make some settings for recording and editing:
-
Lock recorded objects: Recorded objects are protected against unintentional moving.
-
Group objects after multirecord: Objects that belong together will be grouped after a multitrack recording.
-
Destructive editing mode (Wave projects only): Switches between destructive editing and real-time audio editing for wave projects.
This option can also be set directly in the menu File > Project properties
-
Auto crossfade mode/ CD arrangement mode: The respective modes are activated when the project is loaded. For more information, read the corresponding linked help topics.
Bar/BPM
Set here the global time signature (numerator/denominator) and the global tempo in beats per minute (BPM). PPQ is the timer resolution (Peaks Per Quarter) and determines how many ticks a quarter note is divided into.
Tempo and time signature can change during the course of the project, read the chapter Project Tempo for more information on this.
You can have the global tempo determined by selecting a range in the project. Select a range in the project by hearing, using the waveforms, and enter the number of beats that comprise your selection in the field next to Beats in selected range. Then click Get BPM from sel. range, to set the tempo in BPM based on the selected range.
Snap/Grid
Snap to: Here you can switch the grid on and off. Various snap types can be selected:
-
Objects: Objects snap to the edges of other objects and to markers when moved.
-
Beat: Musical time measures are used as step size for the grid. In the menu next to the option you can select the unit for snap.
-
Beat (relative): A beat grid is also used as a basis, but an object retains its relative distance to the next snap point when it is moved.
-
With Snap to range the grid is similar to the beat grid, except that the snap width is defined by selecting a range before activating the grid. The length of this range then corresponds to one bar, and the snap width can be divided according to the Q value as with the beat snap.
-
Frames: A frame length is used as step size. The exact frame length depends on the set frame rate (SMPTE). Thus, the grid corresponds to the spacing of the frames in a video.
-
Frame grid (relative): The step size is also frame, as with the relative beat snap, the relative distance to the snap point is preserved when moving.
For more information on the function of the snap, see Snap
Snap offset to project start: Sets the snap offset relative to the beginning of the project. Use current position for offset specifies the current position of the play cursor as the grid's zero position.
Show grid: When the option is turned on, the grid is displayed, according to the unit of measurement selected in the menu next to it.
Use snap offset also for grid: The snap offset is also used as offset for the grid.
Default Pitch: In this field you can change the default pitch for the concert pitch a' (440 Hz) if you want to use an alternative tuning for the internal tuner.